17 November 2011

Blooper Reel #002: Maple Mishap

So.  I often have crazy ideas.  Sometimes these crazy ideas positively smell of genius.  It turns out that genius can smell an awful lot like fail.

I mentioned in a previous blog post that I had found a new brand of maple bacon to try out in an attempt to recreate my Sweet Tooth Mexican Fried Rice dish.  While the new brand showed better results than Oscar Meyer, it still wasn't up to the task.  So, I decided to try something new.  Something radical.

Adding maple syrup directly to bacon. . .

I'm beginning to see a problem. . .

The thing is, syrupy products like, well, syrup or honey, are hard to cook with.  Or, at least, I've found them to pose several unique challenges.  Namely: they're sticky and easy to burn.  Just. . . just take a look at how that bacon turned out.

Looks like a cross between a xenomorph attack and a burn victim. . .
There are certain instances in which this unique challenge results in delicious.  When I was living in New Orleans I would sometimes add a little honey to the surface of hamburger patties.  This produces a burger that is a crispy well done on the outside while still being a pleasant medium rare on the inside.  For our purposes today. . . the technique is not well suited.
 
Perhaps the biggest challenge of this method is the oncoming clean up. . . *sighs*

Crumbled blackened bacon with the white rice.

After the salsa and egg have been added.

And, the finished product. . .
The end result is not inedible.  It is also a far cry from what I intended.  Rather than a maple sweet contrasting with the salsa spicy, the entire dish took on the burnt sweetness of barbeque.  It's okay, but not what I wanted.

My ideas and advice to myself for future experiments in this area:
-Add the maple syrup much later in the dish.  Perhaps after the rice but before the salsa.  Maybe even after the bacon is done fully cooking.
-Use a god damn measuring spoon for the maple syrup and start small (1/4 teaspoon).  You are not a cowboy shooting from the hip.  You do not eyeball it.
-Consider using real maple syrup instead of store brand maple substitute.

31 October 2011

That Which Should Not Be, Issue #001: Spaghetti and Cheese Sauce

Here's a new column folks.  That Which Should Not Be will be reserved for things I make that are just. . . weird. . . or incredibly bad for you. . . or both.  Also: delicious.  To start off we have an unorthodox variant on an old favorite. . .

Spaghetti and Cheese Sauce

We're not talking about white sauce.  We're talking about the cheddar cheese sauce I use in my macaroni and cheese.  Served over angel hair pasta.  See for yourself. . .
Noodles: check.

Cheese sauce: check.

Abomination against all that is holy: check.


A tiny dab of Creole seasoning.  Honestly, this wasn't enough to make a difference.


All hail His noodley appendage!
So. . . if you love cheese and despise all that is good and wholesome, this is the meal for you!  Seriously though, it's really good.  It has the feeling of being really thick and gloppy, but since when was that a bad thing for cheesy goodbadness?

P.S.: I used about 6 or 7 ounces of dry angel hair pasta.  The cheese sauce was 1 cup of milk and about 3/5 of a brick of smokey sharp cheddar cheese.

22 October 2011

The Philosophy of Food, Issue #019: Baked Mac and Cheese

 "That which thy fathers have bequeathed to thee, earn it anew if thou wouldst possess it."
-Goethe: Faust (reprinted on the dedication page of the Joy of Cooking).

I'm going to apologize for the delay between posts.  I've been having trouble finding time to write, if not necessarily finding time to cook.

In other news, I may have found a maple bacon suitable to re create my Sweet Tooth Mexican Fried Rice.  I'll let ya'll know how that goes.

The dish I'm going to share today isn't my own recipe, so I'm just going to refer you to the cook book I pulled it from and comment a little on how my own process differed.

The Recipe
I made a double helping of the baked macaroni recipe from the Joy of Cooking (34th Printing, March 1984).  This is the first cook book I owned and, sad to say, the first time I've used it.

The Sauce
 

Off to a weird start.

And continuing in the fashion. . .

Doesn't exactly look appetizing at this point. . .

I'd never shredded an onion before.  Had plenty of leftovers. . . get ready to give your tear ducts a treat!

Behold!  Cheese!

Bow to your cheddar-y god!

The odd thing about this recipe, in my opinion, is that the sauce and the cheese are separate.  When I make un-baked mac and cheese, the two things are one and the same.  I might try this with a later baked mac and cheese by creating a cheese sauce and then mixing the other ingredients (egg, spices, herbs, onions, etc) into it.  Or by adding the spices and eggs into the sauce and layering the more solid components into the noodle when I put it in the pan.

Okay, so here's how my own take varied from the recipe.  First off, I didn't measure the cheese.  Instead of measuring out two cups of the stuff (what a double recipe would call for) I opted to use an entire half-pound brick of smokey sharp cheddar.  Remember this simple rule kids: when in doubt - MORE CHEESE!

The Noodles and Assembly


Well butter my noodle and call me a casserole.

The fully assembled dish ready to go in the oven.

Soon.  Soon my plan will be complete.  Muhahahahaha!
 I'm not going to lie.  I normally just eyeball the amount of noodle to use.  In this case, however, I stuck to the amount for a double batch of this recipe: 2 cups.

Actually preparing the noodle is no big issue.  Just follow the directions on the box.  The important details here are in the assembly.  When you add the noodles into the pan you use (I used a bread pan) you need to be careful to layer your shredded cheese in evenly.  I had some difficulties doing this as the cheese I use tends to like to stick to itself.

Once you've gotten all your macaroni into the pan with the cheese layers, pour your sauce in over it.  Try to be as even as possible here.  Once that's done, cover the top in your extra cheddar and top it with something crumbly.  The recipe calls for Au Gratin which is a dry bread crumb mix that can include cheese.  Instead of making this, I opted to just shake out some Parmesan cheese.

The Results

IT LIVES!

Om nom nom!

*CHOMP*
Either because of a natural flaw in the recipe or because of a failure to adequately distribute the cheese I was able to taste distinct zones of 'cheesiness' and 'egg-i-ness.'  I'm definitely making this with a straight up cheese sauce next time.

Another issue I had was that the parsley tended to cluster up together, so parts of the dish had none and in other parts it was overwhelming.  In future iterations of the dish I might leave it out altogether, opting for red pepper or some sort of meat instead.

The shredded onion was unobtrusive, so if oniony taste and texture isn't your thing, don't be afraid.

Altogether the dish was tasty, despite its flaws and my thoughts on improvements.  I finished off the leftovers in about two days.

16 October 2011

Sweet Nostalgia, Issue #004: Mint-Oreo-Stuffed Chocolate Chip Cookies

So, this is pretty straight forward.  With the assistance of fellow internet person Hooded Creature, I attempted to recreate the Oreo-stuffed chocolate chip cookies I made last Spring, but with mint Oreos!

They. . . didn't come out quite as planned. . .

Okay. . . I admit. . . she pretty much took over the heavy mixing.

Dough!

Behold!

Cookie!

The dough, at least, was delicious.

They -look- good. . .

A little too. . . dry. . . and bready. . .

Pictured: defeat.
So.  The first time I made them I followed the Nestle Tollhouse recipe for the cookie dough.  This time we used the recipe packaged with the idea. . . and something went horribly wrong.  They took about twice as long to bake, and baked out dry and crumbly rather than gooey and chewy.  They're still edible. . . but. . . not spectacular.  I want to stress this for all you kids at home: for the chocolate chip cookie dough, just use whatever recipe you normally do.  Trust me.

On a quasi related note, whoever invented mint Oreos is a genius!

An addendum: I leave baking soda out of any and all cookie recipes I use.  That might have been the source of this experiment's failure.  I can say, however, that leaving this ingredient out of Nestle Tollhouse cookies results in delicious.

02 October 2011

The Philosophy of Food, Issue #018: Chicken Stew with Andouille Stuffed Potato Dumplings

The accumulation of a couple different projects and whims, today I crafted what proves to be an epic stew.  Because the process of making this has been somewhat involved, I'll be giving instructions in a few different waves.  First off, the chicken stock was a little something special. . .

Top Secret Beer Broth

  The Ingredients
-1 chicken carcass from a roast chicken.
-1 large onion.
-Garlic powder.
-4 carrots, chopped.
-Cellery.
-Peppercorns.
-A depressingly large quantity of beer.  Have at least a 12 pack ready.

The Process
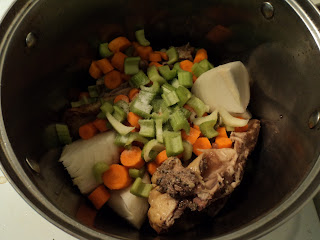
What?  Are we making a salad?
Add the carcass and all your assorted veggies into your stew pot.  I'd go light on the peppercorns, the little buggers can be really annoying if you use too many.  Once everything's tossed in we get to the mildly soul crushing part.  Start pouring bottles of precious beer into the pot until it covers everything.  I used Newcastle Brown Ale, but you're welcome to try it with whatever you feel like.  Just remember one tiny commandment: never, ever cook with something that you wouldn't gladly drink.  I used somewhere between six and nine 12 oz bottles.  Basically all I had in my fridge.

A moment of silence for the valiant beer which sacrificed itself for science.  SCIENCE!
Bring this bad boy to a boil and keep it there for between an ninety minutes and two hours.  Once it's done, separate the liquid beer stock from the meat and veggies and pack it away for another day.  Trust me, you don't have enough time to proceed with the rest of this project in the same day.  At this point you can let the meat and veggies cool and then attempt to pick the bones out, but it's not a requirement.

Chicken Stew

Okay, this part isn't really anything special.  Just my usual 'what ever's in the kitchen' stew.  The real noteworthy bit is my use of the new broth.

The Ingredients
-Top Secret Beer Broth.
-'Brothed' chicken and veggies.
-1 can red beans.
-1 can black beans.
-2 cans stewed tomatoes.

The Process
First off, if you froze the broth like I did, you need to thaw it out. . . this might take awhile.

Rejected Slushie flavor: chicken.
Once the broth is mostly liquid, add in the canned beans and tomatoes.  You shouldn't need to add any additional liquid.  Bring it to a boil and let it stew for an hour, stirring occasionally.   If you're like me and didn't do bone removal before hand, keep a close eye on the surface.  Bones will float up as the meat boils off.  At this point we move on to the next item in this project. . .

Andouille-Stuffed Potato Dumplings

This part of the project was completely whim.  I was originally just going to add potatoes and some red bell peppers to the stew as is usual for me.  In the frenzy of the moment I decided to make dumplings instead, so I consulted the internets and adapted a recipe I found there to my own style and available ingredients.
The Ingredients
-2 to 3 potatoes.
-1 cup all purpose flour.
-1/4 teaspoon baking powder.
-1 egg.
-1 link of andouille sausage.

The Process
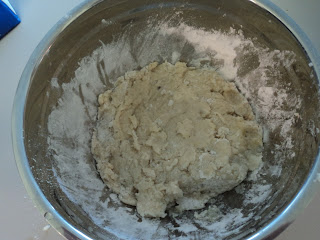
Peel and chop your potatoes while you bring a large pot of salted water to boil.  You want to use two large potatoes or three medium-ish potatoes.  The important part is that you wind up with two cups of mashed potatoes.  Boil the potatoes for about 15 minutes, drain the pot, and mash them up.  Then add the flour, baking powder, and egg and mix it up until you have your dough.  The original recipe called for self-rising flour.  Since that's not something I have in my kitchen, I just added a dash of baking powder to compensate.  No idea if it makes a difference.

What time is it kids?  Improvisational baking time!

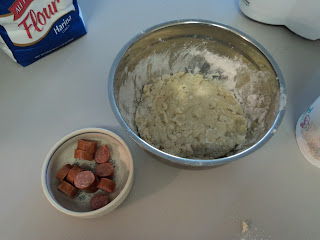
Doughn't this look good?  Okay, bad joke. . .
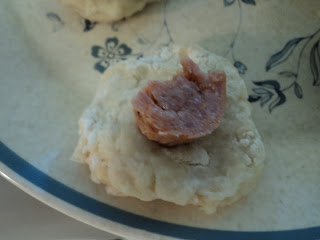
The original recipe instructs me to plant a crouton in the middle of each dumpling.  Not having any croutons handy, I decided to one up the recipe's author.  Namely, by using MEAT.  I cut up a link of andouille sausage and put one piece in each dumpling.

Making dumplings safe for America. . .

I'm sure there some sophomoric joke I could make here. . .

GENTLEMEN!  DUMPLINGS!
The recipe yielded about 9 1/2 dumplings for me.  The estimate was eight.

The next step is to add your delicious sausage-injected dumplings to the boiling hot stew.  Once the stew has sizzled for an hour-ish, drop in your dumplings, cover the stew, and let it cook for another 20 to 30 minutes.

Stand back, or I drop the dumpling!

The Results
Notice anything?  Something missing?  What!?  He didn't use any creole seasoning!  The cad!

Psh.  It's probably mild as milk.
This recipe makes a lot of food, folks.  With cold season on its way in, I figured I might not be the only person eating this delicious chicken concotion, so I thought it best to leave the spicy stuff out, considering that I might wind up sharing with someone of a more delicate culinary persuasion.  I still sprinkled each bowl with a bit of spice though.  It goes especially well with the dumplings.

The stew is still quite good without the spice.  The use of beer instead of water for making the stock does about what I expected it to do: make the whole equation a little richer.  And sweeter.  I might err on the side of not including the beans and tomatoes next time (essentially skipping the middle step).  I'm not convinced they add much to the whole experience.  In a thicker stew they'd come out more, but it just didn't end up that way.

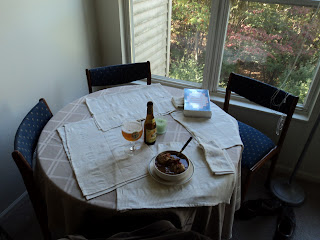
Classy lunch is classy.

I know, that's the wrong glass for that beer.  I need to pick up some Leffe goblets. . .

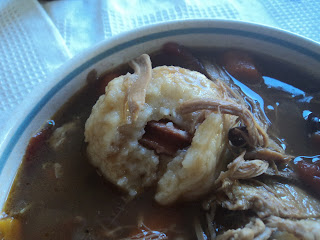
The sausage embedded in the dumplings make for a nice little surprise.

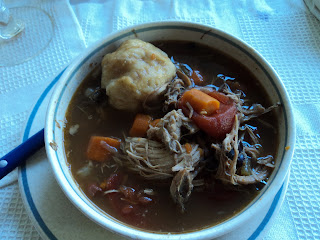
Bowl two.  I'm not sure what to do about the chicken getting so stringy.

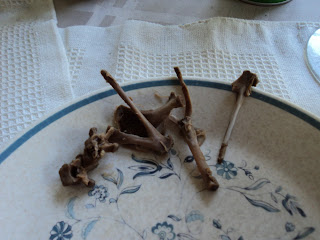
I've yet to master the art of bone removal.

29 September 2011

The Philosophy of Food, Issue #017: Suicide Cookies

It's taking me longer than I thought to get my latest project completed, so I figured I'd share some photos of something I made last Spring: Oreo-Stuffed Chocolate Chip Cookies.  Sounds epic, doesn't it?

The Ingredients
-Home made chocolate chip cookie dough.
-Double-Stuff Oreos

The Process
Encase Oreos in cookie dough.  Bake as normal.

There was technically a recipe I used, but these basic instructions about sums it up.

I use a potato masher in lieu of a mixer. . . because I don't have one.


Pictured: the blackest of sorcery.

I have to admit, it was tempting not to just eat them as is. . .
The Results
 I'll just let the pictures do the talking. . .

Pictured: enough black magic to alter history permanently.

I didn't quite get the hang of using a consistent amount of dough, so the cookies varied a bit in size.

Be warned: one bite is enough to obliterate your soul.